Difference between revisions of "Configure Elicit"
Jump to navigation
Jump to search
| Line 13: | Line 13: | ||
<li>Open the zip file</li> | <li>Open the zip file</li> | ||
[[File:Collector Zip.png]] | [[File:Collector Zip.png]] | ||
| − | |||
<li>Open the file titled "GeniusEngineCollectorInstaller.exe", this will open a setup window called "Genius Engine Collector Setup"</li> | <li>Open the file titled "GeniusEngineCollectorInstaller.exe", this will open a setup window called "Genius Engine Collector Setup"</li> | ||
<ol type="i"> | <ol type="i"> | ||
Revision as of 08:21, 13 January 2015
As you will see, LiveDC utilizes data from all types of sources. Since LiveDC is a platform hosted in the cloud, it requires an onsite data collector. Elicit is LiveDC's local JavaScript application that collects data on an ongoing basis and securely pushes the data up to the LiveDC platform. Elicit comes in two forms: 1) application that resides on a virtual server (Windows or Linux); 2) small appliance to be plugged into the network.
Below is the configuration instructions for the application version of Elicit.
Downloading Elicit
- On the navigation menu (left-hand side) click "Data" and click "Elicit," this will open a new tab titled "Elicit"
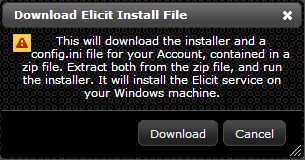
- Within the Elicit tab (upper left-hand corner), click "Download" to create a new Elicit collector. This will open up a new window titled "Download Elicit Install File."
- Click "Download"
- Open the zip file
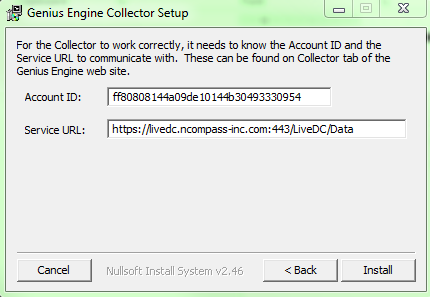
- Open the file titled "GeniusEngineCollectorInstaller.exe", this will open a setup window called "Genius Engine Collector Setup"
- Choose the destination to save the Elicit collector and click "Next"
- Account ID and Service URL will be populated automatically (don't change)
- Click "Install" and let the installation complete
- Click "Close" once done
- Go back to the LiveDC platform, click the "Refresh" button (upper right-hand corner) for the new Elicit collector to appear in the Elicit list
- Highlight the new Elicit and click "Edit" to authorize
- This will open a window titled “Edit Elicit”
- Check the box titled “Authorized” to change the red x to a green check mark to authorize the Elicit
- Click "Save"
- The Elicit collector should now be fully configured and will begin to send data to LiveDC once you have configured data series to collect data.


Upgrading Elicit on Linux OS
- Copy the three (3) new *.jar files to home directory on Elicit
- Utilize WinSCP to copy these files to the host
- Open WinSCP connection to the IP address of the Elicit (i.e. 10.10.10.10)
- Open putty to the IP address of the Elicit (i.e. 10.10.10.10)
- Run the following command to ensure the collector is currently running
- ps –ef |grep pyramid
- Run the following command to stop the collector service and release the files
- sudo service collector stop
- Check in the following directory to ensure the current .jar files are there
- ls /usr/local/bin/collector
- Move the three (3) new .jar files from the home directory to the collector directory
- sudo mv *.jar /usr/local/bin/collector
- Change directory to ensure the new files are there and have the appropriate time stamp (file names will be red at this point)
- cd /usr/local/bin/collector
- ls -la
- Change the ownership on the files from pi to root
- sudo chown root.root *.jar
- Change the permissions on the three (3) *.jar files to enable execution
- sudo chmod +x PyramidCo*
- This shows the files in this directory and the three (3) .jar files should be green and have a "x" in the permissions on the left-hand side
- ls –la
- Reboot the Elicit to ensure that the system is reset and when it comes back up it will now use the new .jar files
- sudo reboot
- Check LiveDC and make sure the version has updated to the date, which was associated with the .jar files
- You may need to authorize it as a new collector on LiveDC