Difference between revisions of "Configure Elicit"
Jump to navigation
Jump to search
(→Downloading Elicit) |
(→Downloading Elicit) |
||
| Line 22: | Line 22: | ||
<li>Click "Close" once done</li> | <li>Click "Close" once done</li> | ||
</ol> | </ol> | ||
| − | <li>Go back to the LiveDC platform, click the "Refresh" button | + | <li>Go back to the LiveDC platform, click the "Refresh" button (upper right-hand corner) for the new Elicit collector to appear in the Elicit list</li> |
<li>Highlight the new Elicit and click "Edit" to authorize</li> | <li>Highlight the new Elicit and click "Edit" to authorize</li> | ||
<ol type="i"> | <ol type="i"> | ||
<li>This will open a window titled “Edit Elicit”</li> | <li>This will open a window titled “Edit Elicit”</li> | ||
| − | <li>Check the box titled “Authorized” to change the red x to a green check mark to | + | <li>Check the box titled “Authorized” to change the red x to a green check mark to authorize the Elicit</li> |
[[File:Elicit_Authorize.png]] | [[File:Elicit_Authorize.png]] | ||
<li>Click "Save"</li> | <li>Click "Save"</li> | ||
Revision as of 11:42, 24 July 2014
As you will see, LiveDC utilizes data from all types of sources. Since LiveDC is a platform hosted in the cloud, it requires an onsite collection device we refer to as Elicit. Elicit is a local JavaScript application that collects data on an ongoing basis and securely pushes the data up to the LiveDC platform. Elicit comes in two ways: 1) application that resides on a virtual server (Windows or Linux); 2) small appliance to be plugged into the network.
Below is the configuration instructions for the application version of Elicit.
Downloading Elicit
- On the navigation menu (left-hand side) click "Data" and click "Elicit", this will open a new tab titled "Elicit"
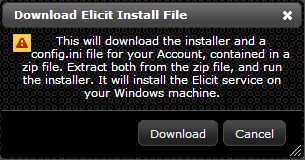
- Within the Elicit tab, in the upper left-hand corner click "Download" to create a new Elicit collector. This will open up a new window titled "Download Elicit Install File"
- Click "Download"
- Open the zip file
- Open the file titled "config" and minimize for later use
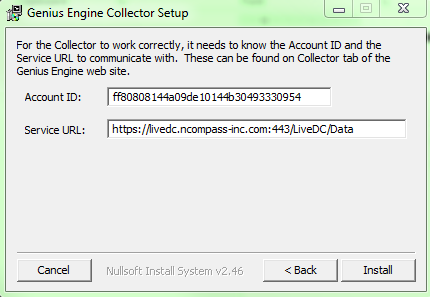
- Open the file titled "GeniusEngineCollect...zip", this will open a setup window called "Genius Engine Collector Setup"
- Choose the destination to save the Elicit collector
- Account ID and Service URL will be populated automatically (don't change)
- Click "Install" and let the installation complete
- Click "Close" once done
- Go back to the LiveDC platform, click the "Refresh" button (upper right-hand corner) for the new Elicit collector to appear in the Elicit list
- Highlight the new Elicit and click "Edit" to authorize
- This will open a window titled “Edit Elicit”
- Check the box titled “Authorized” to change the red x to a green check mark to authorize the Elicit
- Click "Save"
- The Elicit collector should now be fully configured and will begin to send data to LiveDC once you have configured data series to collect data.


